Sunday 24 February 2008

How was your week?

Mine was a bit eventful :)

I took a week off from work just to give some time to myself. I was supposed to have good time being at home, knitting, crocheting, finishing "Designer for DH" and maybe more stuff for myself. But there were other plans for me :) there always are... (I called my Ma the other day and told her what has been happening during the week... and she said, that's why you should never make a plan for yourself)...

Huh !!! so what happened?
I was sick, all week... I had high fever, I was cold and I stayed at home. DH took very good care of me and I even managed to finish a few things. I was thinking of sleeping early and going to work tomorrow while making our lunch... and what happened? I spilt boiling oil all over my left hand. Its burnt. I was throwing the burnt hot oil in the sink and it just popped out.... it spilt all over my left hand, my clothes (Thank God I was wearing thick cotton garments) and I also managed to spill some on dear DH... It was not that bad on him thankfully.

But all is better now. DH got gauge and some medicated bandages and we put Neosporin and all is fine. Although my hand still hurts... his is better. I am sure it still hurts as well.

In any case, on Sunday night, I am here, writing this post, and am feeling almost good enough to go to work tomorrow... I will be good and have fun with work and everything else.

So here is what I finished:
  • Teal Prepster (Ravelry Link. Although it did not come out the right size. I am going to give it to Sister in law in India.

I love this picture of the Bolero in snow. (Got the idea from YarnHarlot)

I just love how this one has turned out. I am thinking of making another one for my sister.

  • And then I had some more Cascade 220 Left over from the Prepster and I thought I need something more... So I opened my Donna Kooler's Encyclopedia of Crochet and picked a stitch pattern and started on with this new Bolero.

Life is Good !

Sunday 17 February 2008

Fourth Design Pattern Available Now !!!

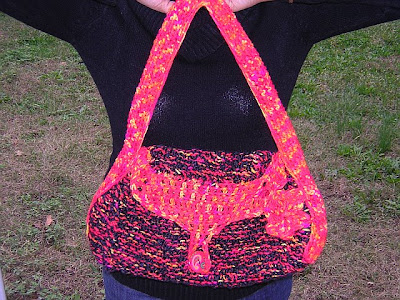
This is my first bag ever. Although I made it last year, I wrote the pattern down only today. The pattern is available for DOWNLOAD.


Patten Notes: This is the first hand bag I ever made. It took a while for me to understand the construction of a bag until I came up with this pattern.
Finished Size: Bag Width 10”
Bag Height (without handle) 7”
Side Panel Width 3”
Side Panel Height 7”
Handle Width 2”
Handle Length can be as short or as long as you prefer. 14” are required to be sewn at both the side panels (7” each side) plus the length preferred to hold the bag.

Materials:
Yarn: Lionbrand Homespun 1 skienRed Heart Ltd. Super Savers Multis/ Ombres (798 Sunshine Print)
Needles/ Hook: US Size 10.5/ 6.5mm
Gauge: Any gauge would work, just work the bag to the dimensions. With both yarns held together work in Garter stitch for the gauge swatch. Multiply the stitches per inch in your gauge with 10 to get the number of stitches to be cast on for the body and with 3 to get the number of stitches for the side panels.
Stitches Used:
Bag Body & Side Panels: Knit Garter stitch (Knit or purl on both sides of the fabric)
Handle: Crochet
Cast On
Body:
The body is knit by holding both yarns together. Cast on the required number of stitches as per your gauge with the cast on method of your choice.
Work in Garter stitch till the piece measures 22” (inches) from the start.
Bind off with your preferred method.
Side Panels:
Cast on the required number of stitches as per your gauge with the cast on method of your choice.
Work in Garter stitch until piece measures 6” (inches)
Next reduce the three center stitches with a no slant decrease every other row until the piece measures 7” (inches) from the start.
Handle:
With one of the yarns (in my case Red Heart) chain 15 or the number required to obtain a 2” fabric width when worked in Double Crochet.
As mentioned earlier 14” (inches) of the handle will be sewn up to both side panels (7” each side). Add on the length of the handle you would like to 16 and work a double crochet fabric with that length and 2” width.
Bind off.
Flower Motif:
Any crochet or Knit Flower Motif can be worked to be attached to this bag.
The one I used goes as below:
  • With Red Heart Yarn Chain 5
  • Using a slip stitch join with the first chain.
  • Chain 1
  • Single crochet in the centre of the circle
  • Chain three
  • * Single Crochet, Chain 3
  • Repeat from * 3 more times
  • Join the last chain 3 in the first chain 1 with a slip stitch.
  • Slip stitch to the first chain 3 space.
  • Chain 1 *, Single Crochet, 2 Half double crochet, 4 Double crochet, 2 Half double crochet, Single crochet*.
  • Repeat from * to * for every chain three space.
  • Join with a slip stitch to the first Chain 1.
  • Bind Off.

Putting it all together:

By now we have all the individual parts made.
  • Main Body (10”x22”)
  • 2 pieces Side Panel (3”x7”)
  • Handle (2” wide and 14” + desired length)
  • Keeping the right side of the fabric outside, choose one end of the main body as the front of the bag (that will go under the flap) and sew the two side panels to each side of body (length wise). (7” of the body covered lengthwise.)
  • Sew the bottom of the side panels to the next 3” of the main body. (total 10” of the body covered – lengthwise.)
  • Sew the free lengthwise side of the side panel to the next 7” of the main body (total 17” of the main body covered – lengthwise.)
  • The remaining 22”-17”=5” of the main body (lengthwise) would serve as the flap for the bag.
  • Next pin one side of the handle (7”) to the centre of the side panel (leaving half an inch on each bottom edge.)
  • Repeat the same for the other end of the handle with the other side panel of the bag.
  • The remaining serves as the length of the hand bag to carry over your shoulder or in hand. (as you may have chosen.)
  • Now turn the bag inside out and sew the handle to the side panels with the same yarn that was used for the handle (thus making the seam invisible).
  • Turn the bag right side out again.
We are almost done except for the front panel lace.
  • With the Red Heart yarn single crochet all around (3 sides) the flap once.
  • Chain 2 turn, and double crochet over the single crochet carefully counting the number of stitches around the way.
  • Say the stitches were 60 divide them in three parts (2 smaller equal parts for each side and one larger middle part lets say 15,30,15).
  • Slip stitch to the 15th double crochet, chain 2, 29 double crochet, turn.
  • Slip stitch 3 double crochet, chain 2, 22 double crochet, turn.
  • Slip stitch 3 double crochet, chain 2, 16 double crochet, turn.
  • Slip stitch to the 9th douoble crochet and chain 10 for the button loop. Join the chain back to the beginning and bind off.
  • Sew a button on the front of the body of the back such that the flap is held secure by buttoning the loop.
  • Next and the final step is to attach the flower motif on one side of the bag front.
And that’s all there is to the bag. Enjoy !!!

Monday 11 February 2008

Third Design Pattern Available now !

I just finished writing the pattern for Garnet. The PDF for the same is available for DOWNLOAD now.


Patten Notes: I created these on my way back from the Pittsburg Knit and Crochet Festival. I have never designed or even thought about the construction of fingerless gloves… but this just happened to me… Garnet is a my little miracle !

Here is how I determined how many stitches to cast on for a perfect fit.

I measured my lower wrist circumference: 8” and upper wrist: 7” I took final circumference as 7” since I was going to use 2x2 ribbing and that fabric stretches a bit.

My guage was 5 sts per inch so that gives me a total of 35 sts to cast on. I used 36 to get an even number of stitches for the 2x2 ribbing.

The broadest part of my hand was 8.5” so I figured an increase of 6 stitches after the cuff would give a good fit and it did.

Finished Size: Lower wrist 8”

Upper wrist 7”

(Please write to me at essknits@gmail.com for more sizes.)

Materials:

Yarn: Simply Soft Caron

Needles: US Size 6 Double points

Gauge: 5 sts per inch

Stitches Used:

Start: 2 rows of garter stitch (Knit both sides on straight needles and Knit one row and purl the next in the round.)

Rib: 2 x 2 ribbing

Knit 2 Purl 2 in the round.

Body: 3x3 checkerboard

Row 1-3: Knit 3 Purl 3 in the round

Row 4: Purl 3 over the previous knit three and Knit 3 over the previous purl 3

Row 5 – 6: Purl 3 Knit 3

Repeat rows 1-6 for the pattern.

Cast On

Cast on 36 stitches with the cast on method of your choice.

Row 1-2: Make 2 rows of Garter stitch. (There will be 12 stitches on 3 double points.)

Row 3-19: Start 2x2 ribbing and continue the same for 16 rows.

Row 20: Knit all stitches while simultaneously increasing to 42 stitches in the round (14 stitches on each of the three double points.)

Row 21-38: Start with the checker board pattern and make 3 repeats of the set.

Row 39: Knit 3, Bind off 9 stitches (purling the purls and knitting the knits) Continue in the pattern. (total 33 stitches 11 stitches on each double point)

Row 40-48: Continue knitting in the round for 1.5 set of checkerboard pattern. (while closing the gap where the 8 stitches were bound off to give an opening for the thumb.)

Row 49: Start 2x2 ribbing while decreasing one stitch anywhere in the round so the total stitches are now 32 (11 sts each on two double points and 10 sts on one.)

Row: 50-60: Continue on for the desired length.

Row 61: Bind off loosely.

New York Giant's Winning Parade Day - Crowd

I just love New York City and New Yorkers.
It was 5 Feb 2008 and I was on my way to my office....


The atmosphere was so amazing, Blue and Red everywhere... crowd cheering even before the parade started...


Best Weekend Ever !!!

I just had the Best Weekend Ever !!! I had gone for the Pittsburgh Knit and Crochet Festival, and I had such a blast !!!

This was my first time attending a fiber festival ever and I was so happy and excited. I loved being there.


I had the pleasure of meeting two ladies who I admire most and am always inspired by... Annie Modesitt and Robyn Chachula.

Annie Modesitt

Robyn Chachula

I even took Annie's class on the cocoon shrug... Hurray !!!


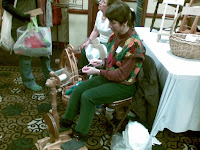
I was fascinated by looking at this lady spinning.... what a gorgeous spinning wheel. She told me it was from MajaCraft.


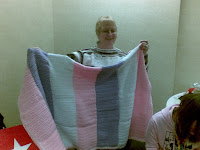
I helped the ladies at the "Warm Up America" room and met some very nice people there.


Made myself a yarn necklace with others in the same room...


Ofcourse I got goodies for me... (what were you thinking?)
Yarn you will see as projects very soon... here are some of the other things I acquired over this weekend.


I got myself a new look as well...


Adopted BOZO.... she is such a darling !!! :) I am going to knit her so many clothes and accessories from my stash...


And that's not all I finished the double sided cap for DH and also made myself a pair of fingerless gloves on the way back...


Just in time for Valentine's Day.


I am calling these beauties "Garnet"


And this is what I did just before publishing this post...

Ripped off the ugly to reveal the beauty.... I present to you.... Desert Rose - The New Avatar.

Thursday 7 February 2008

Crochet Conversion Chart (American and British English)

I have seen a lot of crochet patterns that use abbreviations but do not specify the region to which the abbreviations belong. For avoiding any confusion, following is a Conversion Chart of basic crochet terminologies used in American English and British English.

Monday 4 February 2008

First Design Pattern Available now !

I have created my first design pattern for the "Sofa Throw" featured earlier on the blog. This is now available for Download as a PDF document.


Finished Size: Approximately 37 x 82 inches

Dimensions: 3 stripes each containing 6 alternating rectangles of Color A and Color B. Each rectangle is 13x11 inches

2 inch wide crochet edging all around the assembled larger block made from sewing together the 3 stripes as per the assembly diagram.

Materials:

Yarn: 2 skeins Red Heart Ltd. Sport Flecks – White (Color A)

2 skeins Red Heart Ltd. Sport Multi – Blue (Color B)

Needles: US 8/ 5.0mm as recommended in the Yarn Label

Gauge: As per the yarn label

Pattern Note: The entire piece is assembled by sewing together 3 long stripes and then crocheting an edging around the larger block.

Ideal yarns for this project are any worsted or Bulky weight yarn.

Stitches Used:

Knit: 1 x 1 ribbing

Row 1: Knit (k) one, Purl (p) one

Row 2: p the k stitches from previous row, k the p stitches from previous row.

Crochet: Chain (ch)

Single Crochet (sc)

Double Crochet (dc)

Stripe Pattern:

Make 3 stripes each made up of 6 alternating rectangles of Color A and Color B as per the assembly diagram. Each rectangle measures 13x11 inches. Each stripe measures 78x11 inches.

With Color A - Cast on the required number of stitches as per the gauge for 11 inches wide piece and work in 1x1 ribbing until the desired length (13 inches) is reached

Join Color B at the beginning of the next row and work in 1x1 ribbing until desired length (13 inches) is reached.

Work in the established pattern until desired length of stripe (78 inches) is reached.

Crochet edge:

1st round: sc around the entire edging of larger block

1 sc, 2 ch, 1 sc at each corner

2nd round: dc around

1dc, 1 ch, 2dc, 1ch, 1dc at each corner

Assembly Diagram:


Enjoy and have fun!