Monday, 26 January 2015

Review: 50mm 1.8g lens for DSLR

Last year I received a long desired gift... a DSLR. Since then I have been getting to know all its features and capabilities. I took some awesome pictures after the huge winter storm of last year. Here are a few.


These were all done with my kit lens 18-55mm VR. It is a great lens with excellent sharp results. However, when doing portraits, I was not getting that dreamy bokeh effect that I loved in some great portraits I have seen on the web. So it was time to add a prime lens to the arsenal. So this year, I got the Nikon 50mm 1.8g lens as a gift and was immediately thrilled with the resulting photographs. It was just what I wanted. Although I would need to move closer and farther to get the right focus and frame.

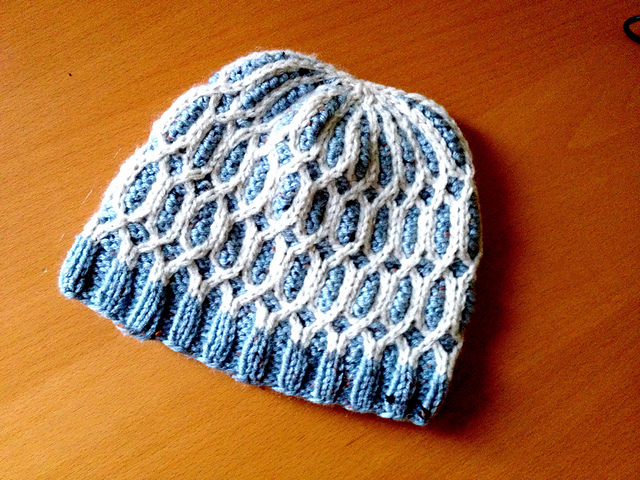
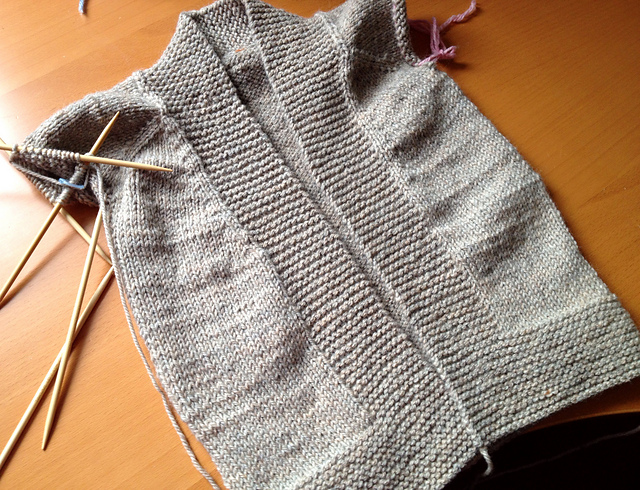
Here is a picture I took when submitting my design to Knitty.com two years ago. This uses the kit lens.


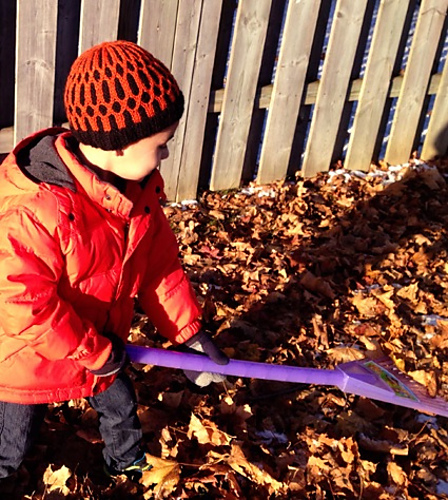
Here is one I took for the self-published version of the pattern with the 50mm lens.


The difference is quite evident. I love my new lens.

------------------------------------------------------ © DESILOOP

Monday, 19 January 2015

New Year, New Me...


Well, at least I would like to think so.
Its been long... and the experiences have made me realize I have spent too much time worrying about everything and everyone around me. Its time now to look at myself and focus on things that make me happy. Things I have wanted to do for so long (and there are so many...) and I have been deferring all this while to wait for the right time. The right time, well I guess now, it is when you want it to be. So now I am trying to experience more of life.

  • Spend more time with and for family
  • Experiment even more with food
  • Explore my DSLR and photography
  • Organize my house and life
  • Make time for creativity and DIY
  • Post to instagram at least once a day
  • Watch all Movies and Series on my list
  • Review most products I own including services I use and love
  • Change to a healthy lifestyle and recover
  • Loose weight
  • Communicate more with friends and family
  • Do, not just for the sake of it, but when it matters
  • Forgive
  • Hear and see reality
  • Rest adequately
  • Be happy
  • Find me...


------------------------------------------------------ © DESILOOP

Monday, 8 December 2014

More Lined Hats

Here are two more freshly lined hats. One is for my son's winter festival. Both of these are crocheted using My Little Minion pattern. You can easily see from my Olaf version (snowman), that you can easy customize the embroidery and appliqué on the hat to take on various personalities. There will definitely be more in the future at my end. :)


You can find the tutorials for how I do this on my previous post here.


------------------------------------------------------ © DESILOOP

Friday, 14 November 2014

How I Line My Handmade Hats

Off late it seems that I cannot get enough of colorwork projects, especially earflap hats. Having Cheery Scrap Hat, left me wanting more. Little lad was quite happy with this one.

Designer: Kate Oates
Pattern: Petite Purls, Issue 3 Winter 2009


And we discovered that my head size is just half an inch more than his so we can practically share all our hats.


And then came the flurries. Yes its gone below zero where we live. So this beautiful hat just wouldn't cut it for us. IDEA.... let's line it with something warm mama.... that ways it will fit me better too. So off I went to my fabric stash to find some fleece.

Here is how I lined this hat.

TUTORIAL

Fold the fleece fabric in half such that the whole hat fits, with earflaps on the double fabric. 


Fold the hat sideways so that the earflaps are on top of each other. Use fabric chalk/ marker to draw the outline of the hat, quarter inch out of the actual edges.


Now cut both layers along this outline.


Now we need to sew the two layers together. This can be done either with a needle and thread or with a sewing machine. I chose a sewing machine and a zig zag stitch. However, a longer straight stitch would also do. Also I did it in red thread so it would show up in the picture, but you would need to match your thread to your fabric. Sew along three sides of the head circumference, leaving the bottom edge and earflaps alone. If your fabric has one better looking side than another, keep that one facing the other layers side, sandwiched in between so that the less pretty side is outside for the seam.


Now we fold the lower edge inward toward the larger part of the hat and continue doing so along the earflaps and out the other end (one layer at a time, we do not want to sew the layers together.... our head needs to fit in). Sew along the folds as neatly as possible. This side won't show up so it doesn't really matter.

We are now going to turn our hat inside out and place it inside this fleece hat. Do a blanket stitch all around the edge. I created a short video for this here:


Next secure the top of the fleece to the top of the knit hat by tacking it down a few times.

Enjoy seeing the warm and fuzzy expression on the wearer's face :P

Here is how the hat will look inside out.


Be warm!

------------------------------------------------------ © DESILOOP

Saturday, 1 November 2014

Following a pattern

I am here to tell you that I am in the same boat with folks who either accidentally or purposely stray away from a pattern as it is written. And in my case I think it is really necessary to stray and experiment and then enjoy the results. Its all a part of the learning process for me and I learn about things that can or cannot be done to a pattern to make it work.

Take for instance my latest published pattern Uljhan on Knitty Deep Fall 2014 issue. Seeing the lovely projects creeping up in the ravelry projects, I started craving my own. Most of my prototypes are sized for children in order to take pictures, since in my case, I haven't had the chance to get the right equipment to take my own pictures (I am getting there). 

Here it is: (here on ravelry)


Do you see any differences? Well, there are a couple actually, although it doesn't seem much different from the original pattern.

Firstly I am using the contrast yarn for the ribbing. Totally intentional since I didn't have enough of the magenta.
Second, I have one row less when compared to the original chart, missing the cross over cable of purple over purple. (An accident in the first one, and intentional in the second repeat since I had to be consistent)

It totally works and is quite cozy, as was intended. I think I am going to re-visit the decreases in the adult sizes at some point in future. But this is going to have to do for now. The tail is tucked inside the hat and not woven it, so I can easily unravel it when I am ready to revisit the decreases. Who knows, there might be a top-down version too. We will see. Until next time, happy knitting/ crocheting.

ETA:
One more thing I wanted to add... Since I used left over contrast from another project for my ribbing, I had to join in a new skein. This time, instead of my usual russian join I used the double knot technique demonstrated by Jane Richmond in one of her videos. I was really surprised to see how well the thing stays together. I tugged and tugged and it won't come apart. I think this is now my new favourite join technique.

Here I have put the knot together.

Here I have cut really close to the knot and tugged a lot, but it has not come apart.


------------------------------------------------------ © DESILOOP

Tuesday, 21 October 2014

Uljhan Errata

Thanks to some lovely knitters who have already completed their hats.

Check some finished projects here on ravelry: http://www.ravelry.com/patterns/library/uljhan-beanie/people

A few errors have been pointed out to me for which I am posting corrections below:

ULJHAN ERRATA
  • Title is misspelt on Knitty as Ulijhan
  • There are some places where numbers for only six sizes are given instead of seven. Here are the corrections:
    - Under Cuff - Work Ribbing as set for 1(1, 1.5, 1.5, 1.5, 1.75, 1.75) inches.
    - Under Establish Body Pattern, work said number of rounds from chart until hat measures approximately 4(4, 5.5, 5.5, 6.5, 7.75, 8.75) inches from CO (Whole paragraph is repeated twice)
    - Rnd 2 of crown decrease ends with 30(36, 42, 46, 52, 58, 64)sts
  • For crown decreases cut MC not CC. The decreases will be carried through in CC
------------------------------------------------------ © DESILOOP

Friday, 17 October 2014

Uljhan on Knitty! A first for me.

What a year this has been... Phew!

Earlier on getting shocked by the news of brain tumor, then going through the ordeal of surgery worrying what next. Thanks to the amazing support and well wishes of my family and friends during this recovery, which still continues. This entire episode has rendered me unable to perform most normal tasks, due to balance issues, blurry visions and major headaches. But slowly and steadily with everyone's support, I hope to be back.

Later this year (yesterday afternoon), getting a great surprise from Knitty.com that my pattern Uljhan is now live as Deep Fall 2014 surprise.


OMG....  It has still not sunk in. I made this submission last year, well before I knew about the reason for my extreme headaches. A lot has happened between then and now, but I am glad, happy, dancing, jumping, squealing with joy, and still in the clouds to see one of my long time dreams come true. Thanks a lot Knitty for making my day!
You can find the pattern here on Ravelry.

Here are the two I made. There are more made by my testers last year which they will be sharing on ravelry.


Happy Knitting and Crocheting and all things yarny and crafty, till I can get back to blogging again!

Best,
SSK
------------------------------------------------------ © DESILOOP

Saturday, 28 December 2013

A New Test - Part 3 (Final)

I thoroughly enjoyed my test on this one since there were such subtle but clever design elements all along. Still love the collar bit and am planning to use the technique in one of my own future patterns. For now, here are some finished project pictures.

Flat view

I contemplated on which kind of closure I want for this one since the pattern didn't offer a suggestion while test knitting. So even though I tool some great pictures with a DPN as a pin to close the fronts, I decided I needed a more permanent and practical option. So I have finally added an I-Cord closure to this sweater and it works really well.


Here is a closeup


In the end, I would highly recommend this pattern for folks with kids in addition to themselves. Here are the details:

Pattern Name: Harvest
Designer: TinCanKnits
And I am sure other sites where the designer is available.
Sizes available: Newborn to 4XL

------------------------------------------------------ © DESILOOP

Friday, 13 December 2013

A New Test - Part 2

Since my last post, I have rather enjoyed completing my test knit. I completed it on Dec 1 while knitting a few rows everyday since I began. It is difficult to get knitting time during weekdays whence juggling between full time work, taking care of son after school and then maintaining the house and cooking dinner for the night and lunch for next day for everyone. I admit I also skip my lunches most of the time. Anyways, I do try to get in a few minutes of knitting or crochet while watching TV most nights. 

So I did do two gauge swatches for this project but none of them gave me the exact gauge as in pattern. (See previous post for details) Gauge 2 was the closest with stitch gauge matching exactly and row gauge 2 rows short. i.e. pattern required 28rows per 4 inches but I got 26. This is generally the case with me. I do try to match stitch gauge exactly and then follow the directions for inches instead of exact number of rows in the pattern. Of course for me to be able to do that, the pattern needs to have the required inches information. And this one did. However, there was a confusion due to two different stitch gauges mentioned in the testing call and the actual patterns. After getting clarity on this, I would say, the rest of the knitting went on smoothly. Any errors/ confusions/ issues that I found, were already addressed or pointed out by other testers. Here are a few pictures of the project in progress.

Here I have completed knitting the back neck.


Here I have done the yoke and all front increases but I was too quick… 


I had made a mistake and misinterpreted the directions. Some of the front increases were to be done after sleeve separation, so I had to frog back to before sleeve separation and then redo this bit. This looked much better and exactly as per given directions.


Here I have completed the body and am on to knitting the sleeves.


I rather like that the front bands are completed with the body. Just wished there was some kind of closure added to the directions. Hoping that the final published pattern would have it.

Stay tuned for final project completion and modeled pics in the coming weeks.

------------------------------------------------------ © DESILOOP